Press Tab (or Mix in the transport) to open the mixer, and Tab again to go back to the song.
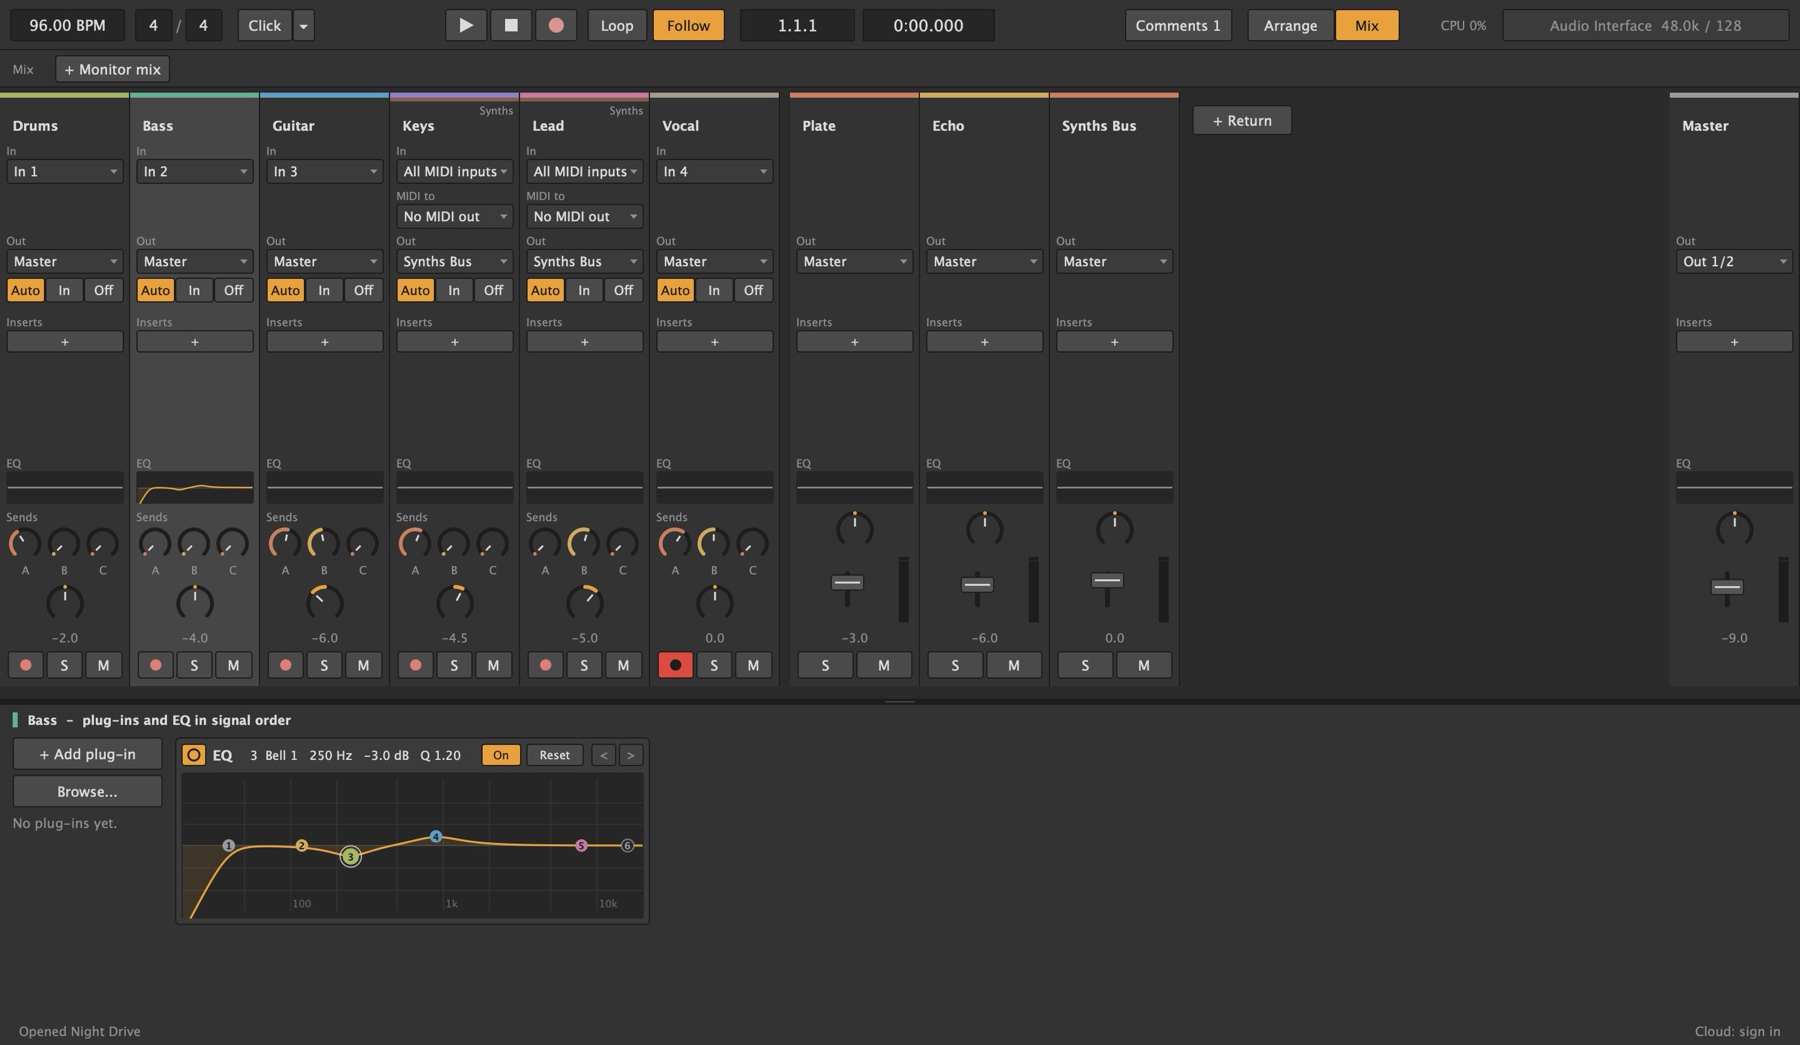
A channel strip
Each track's strip has:
- Its input and, for a track you record, monitoring: Auto (hear the input while armed), In (always) or Off (never; use your interface's direct monitoring). A MIDI track also has MIDI to, for a hardware synth.
- Its plug-ins, and + to add one.
- The EQ curve. Click it to open the channel EQ in the device panel.
- One send knob for each return.
- Pan, the fader and a level meter, with arm, solo and mute.
- The output: where its sound goes.
The returns, group buses and the master come after the tracks.
Routing
- Inputs: any mono input of your interface (In 1, In 2, ...), any stereo pair, or another track (see Recording).
- Outputs: each track goes to the Master, to a return, or straight to an output of your interface, for re-amping or outboard gear. The master goes to whichever output pair you choose (1/2 by default).
- Plug-in delay compensation is automatic, exports included: a plug-in that delays its sound doesn't put its track out of time.
Sends and returns
A return is a channel for a shared effect, like one reverb several tracks send to. Add one with + Return in the mixer, Cmd/Ctrl+Alt+T, or right-click empty space in the arrangement.
Every audio and MIDI track has one send knob per return (A, B, ...), after the fader by default. Turn it up to send some of the track to that return. Put Reverb or Delay on a return and it starts at Mix 100%, since the track's dry sound is already in the mix.
Group buses
A track group can have its own bus: a channel every track in the group plays through, like a drum bus. Click FX on the group's header (or right-click it > Add Plug-ins to the Whole Group).
- The bus opens in the device panel, so you can add plug-ins (a compressor, a reverb), the channel EQ and a fader that process the whole group at once.
- Tracks that join the group later play through it too; tracks that leave go back to the master.
- The bus shows in the mixer with the returns.
- Right-click the group header > Remove Group Bus to send the tracks straight to the master again.
Without a bus, a group only controls its tracks together. With one, their sound is mixed and processed together too. In the mixer, members show the group's name above their own.
Monitor mixes
A monitor mix is a second mix of the same channels, on its own pair of outputs: an in-ear or headphone feed for the players. You could have the hi-hats on the left in your in-ears while they sit on the right in the main mix.
- In the mixer, click + Monitor mix. It starts as a copy of the main mix and goes to the first free output pair (3/4 on most interfaces, where your in-ear or headphone amp plugs in).
- Switch between Main and your monitor mixes with the tabs above the strips.
- In a monitor mix, the faders, pans and mute buttons set that mix's own levels. The faders and the strip edges turn the mix's colour, so you know which mix you're editing. The master strip becomes the mix's volume, output pair and mute. The main mix doesn't change.
What a monitor mix hears:
- Each channel after its plug-ins and EQ, and before its main fader. The main fader, pan, mute and solo don't affect it.
- Returns at their own level in the mix, fed by the main sends. Tracks routed into a return are heard through that return.
- Click: each monitor mix has its own metronome level. Turn off Click in main to hear the click only in your monitor mixes.
Right-click a mix's tab to rename it, copy the main mix's levels into it again, or delete it. Monitor mixes are saved with projects and templates, so a tracking template can carry your in-ear mix. They're for listening only and aren't exported.
The channel EQ
Every track, return, group bus and the master has a built-in EQ with six bands: a low cut (24 dB/oct), a low shelf, two bells, a high shelf and a high cut.

- Each mixer strip shows the EQ's curve. Click it to open the EQ in the device panel.
- Drag a numbered point to set its frequency and gain.
- Scroll (or Alt-drag) on a bell to set its width.
- Double-click a bell or shelf to set it back to 0 dB, or double-click a cut to turn it on or off.
- The power button bypasses the whole EQ. Reset flattens it.
- A flat EQ uses no CPU: Lathe skips any band at 0 dB and any cut that's off.
Where the EQ sits
The EQ starts after the plug-ins, and you can move it in among them. Drag the EQ card by its name to another place in the chain (a line shows where it will land; Escape leaves it where it was), or use its < and > buttons. Moving it is one undo step and is saved with the song.
- On the master, move the EQ before Mastering (or any limiter) for tone changes on the whole mix. After the limiter, a boost can go past its ceiling.
- On a MIDI track, the EQ can't go before the instrument: there's no sound there yet.
- Adding or removing a plug-in leaves the EQ between the same neighbours. If it's last, it stays last as plug-ins are added.
Hearing what a change did
Before you keep a mix change, compare it with how it was: see Compare. The AI assistant can also listen to the mix and tell you what's clipping, what's fighting the bass, and how loud it is.